Settings, Integrations & Hardware
Complete POS guide · Start a POS trial · Setup checklist
Per-Station Configuration
Named terminal configurations with independent menus, printers, and access controls. The bar terminal sees only drink categories, the hostess station sees only table service. 📍 Assign — one tap per iPad binds the terminal to its station by device, and it auto-selects that station on every login and reload. The binding survives Wi-Fi changes, router reboots, and new DHCP leases — no station picker, no network configuration.
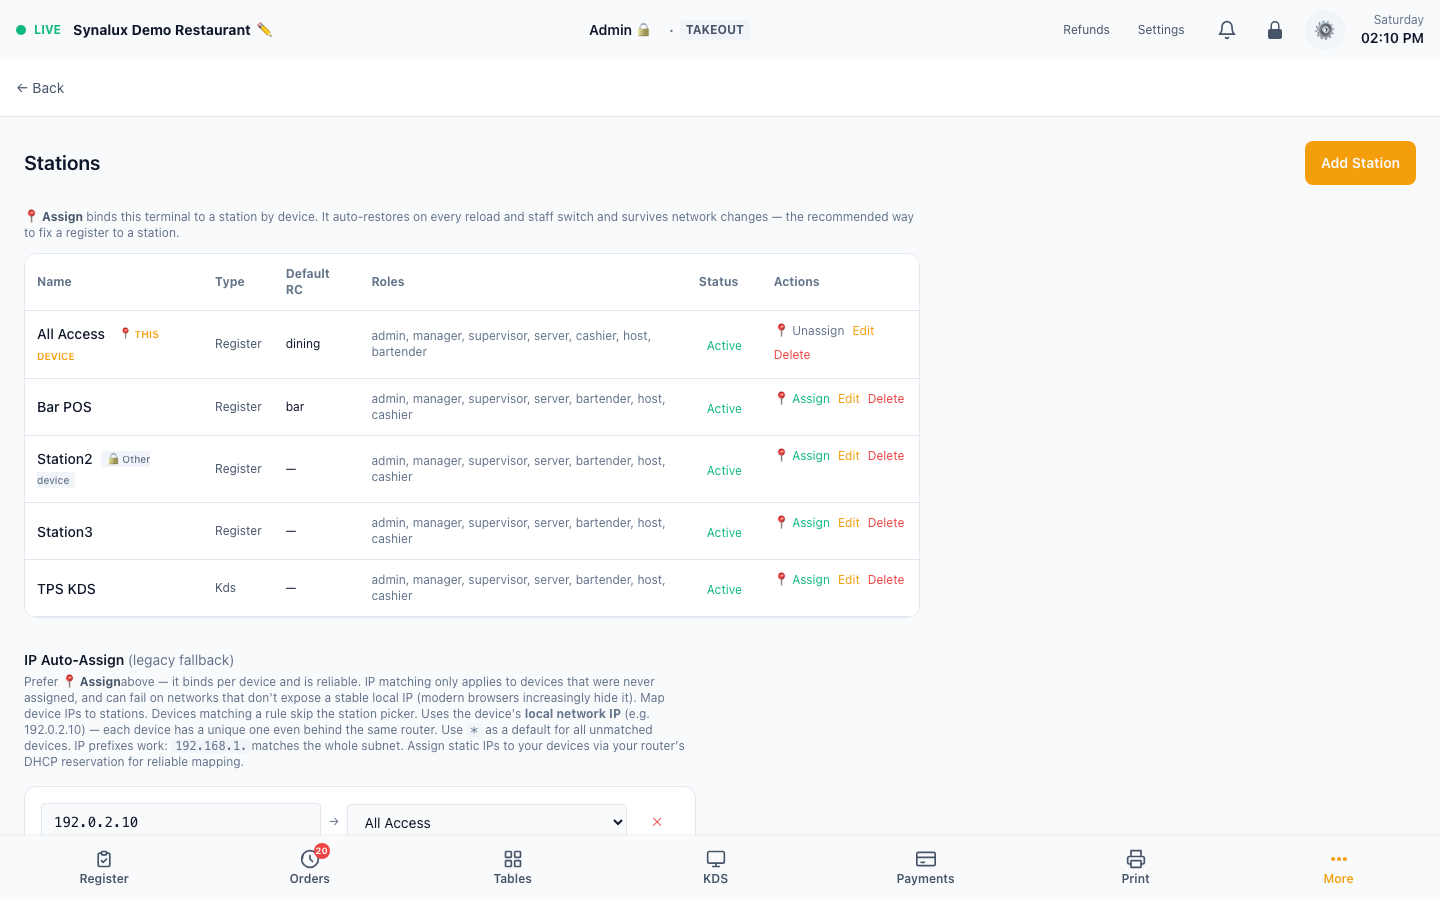
The active station shows next to the staff name in the top bar (e.g. Alex M. · BAR POS), so staff always know which terminal identity they're ringing on.
Setup
- Go to Settings > Stations > Add Station
- Set Name ("Bar POS", "Hostess", "Drive-Thru 1")
- Assign Menu Categories — only these categories appear on this terminal
- Assign Printers — this station sends tickets to specific printers
- Set Default Revenue Center — auto-selects RC when staff logs in
- Set Allowed Roles — restrict which staff roles can use this station
- Set Allowed Revenue Centers — restrict which RCs are available
One-tap device assignment:
- Walk to the bar iPad → open Settings > Stations
- Tap 📍 Assign on "Bar POS" → this iPad is now bound to that station, marked with a 📍 This device badge (stations bound to other terminals show 🔒 Other device)
- On every future login, this iPad auto-selects Bar POS — no station picker, no manual steps
- Repeat for each device: dining iPad → "All Access", takeout iPad → "Takeout"
- 📍 Unassign releases the binding; if a device has no assignment, the station picker appears at login
First-login claim: on an unassigned terminal, the station picker after PIN entry claims the chosen station for that device — same effect as Assign in Settings. Stations already claimed by another terminal show "In Use"; managers can override to move a station to a new device.
IP Auto-Assign (legacy fallback): the section at the bottom maps device IPs to stations for terminals that were never device-assigned. Prefer 📍 Assign — IP matching depends on the network exposing a stable local IP, which modern browsers increasingly hide. Existing rules keep working; * acts as a default for unmatched devices and IP prefixes (e.g. 192.168.1.) match whole subnets.
Integrations
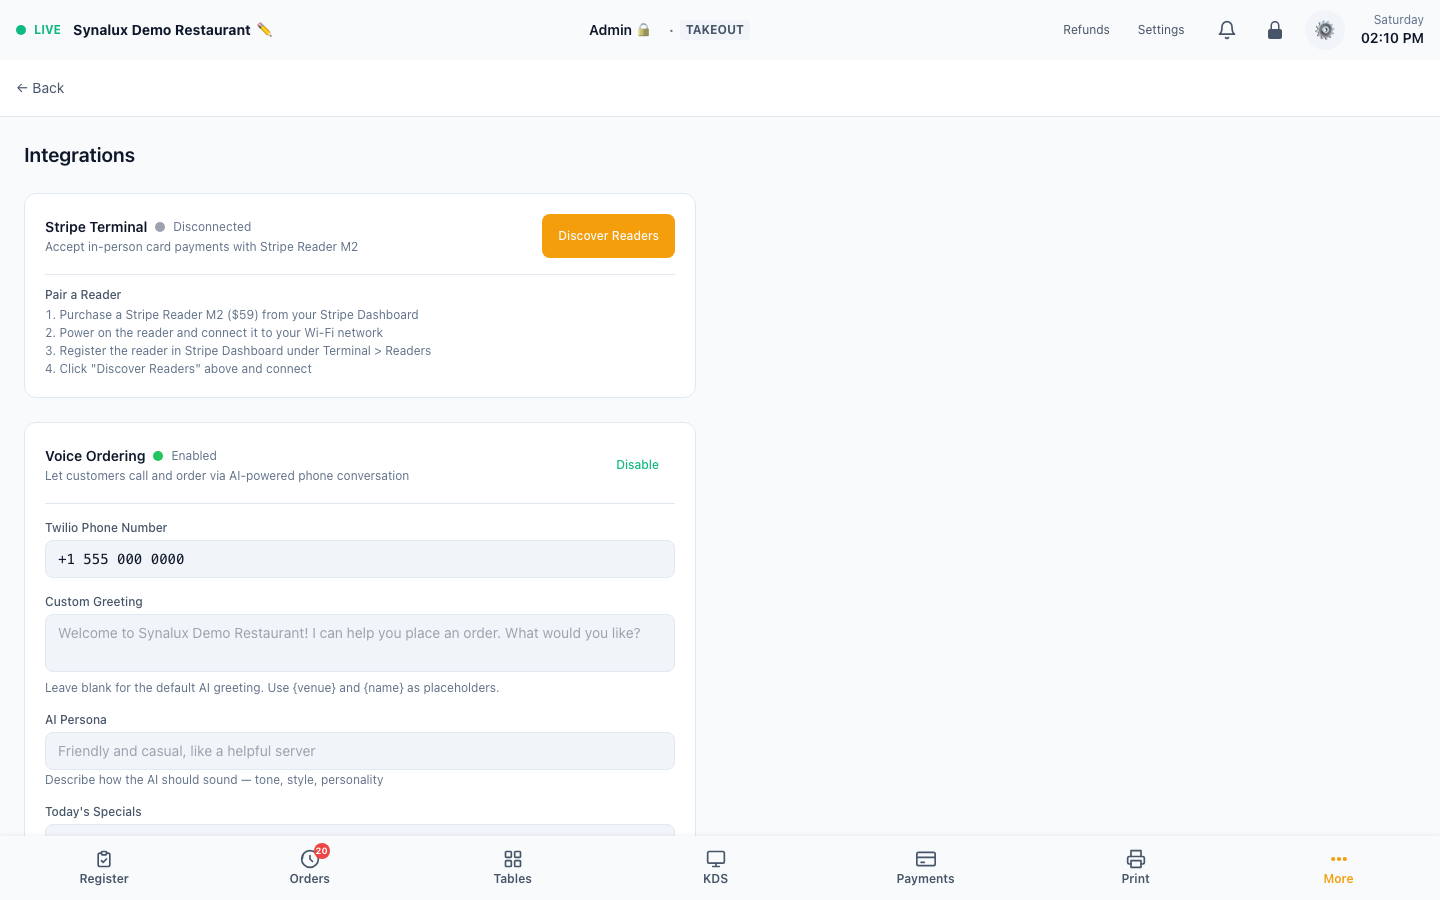
Customer-configurable connection cards currently include Stripe Terminal, DoorDash, Uber Eats, Grubhub, QuickBooks, Xero, Gusto, ADP, OpenTable, Google Reserve, Yelp, Google Calendar, Google Drive, Gmail, Outlook, and Slack. Voice Ordering and WhatsApp use their dedicated setup section. Dejavoo terminal settings are managed with the venue's payment configuration rather than through a generic connection card.
The Settings page is a control surface, not proof that a provider is connected. The current screenshot is included to show where integrations are configured; any disconnected status remains visible and must not be interpreted as end-to-end provider acceptance.
Setup
- Open Settings > Integrations and use the connection flow shown for the provider. Contact Synalux onboarding when a provider requires account approval or assisted activation
- Stripe — connect the venue merchant account and location, pair supported readers, then authorize and refund a real test payment. Tap to Pay additionally requires the supported iPhone app and device
- DoorDash / Uber — connect the venue's provider account, then verify a menu sync, delivery quote, dispatch, status update, and cancellation as applicable
- SMS / email delivery — confirm the approved sender, customer-consent flow, receipt or notification content, and real delivery to an accessible test recipient
- QuickBooks / Xero — connect the venue account, then verify an external export and reconciliation before relying on the integration for close
Printers & Cash Drawer
Thermal receipt printers, kitchen ticket printers, and cash drawers. Network (LAN), USB, and Bluetooth options are available for Epson, Star, and generic ESC/POS hardware. Browser-native USB/Bluetooth still depends on a compatible browser, operating system, device permission, and printer interface; some hardware may require its vendor driver or utility.
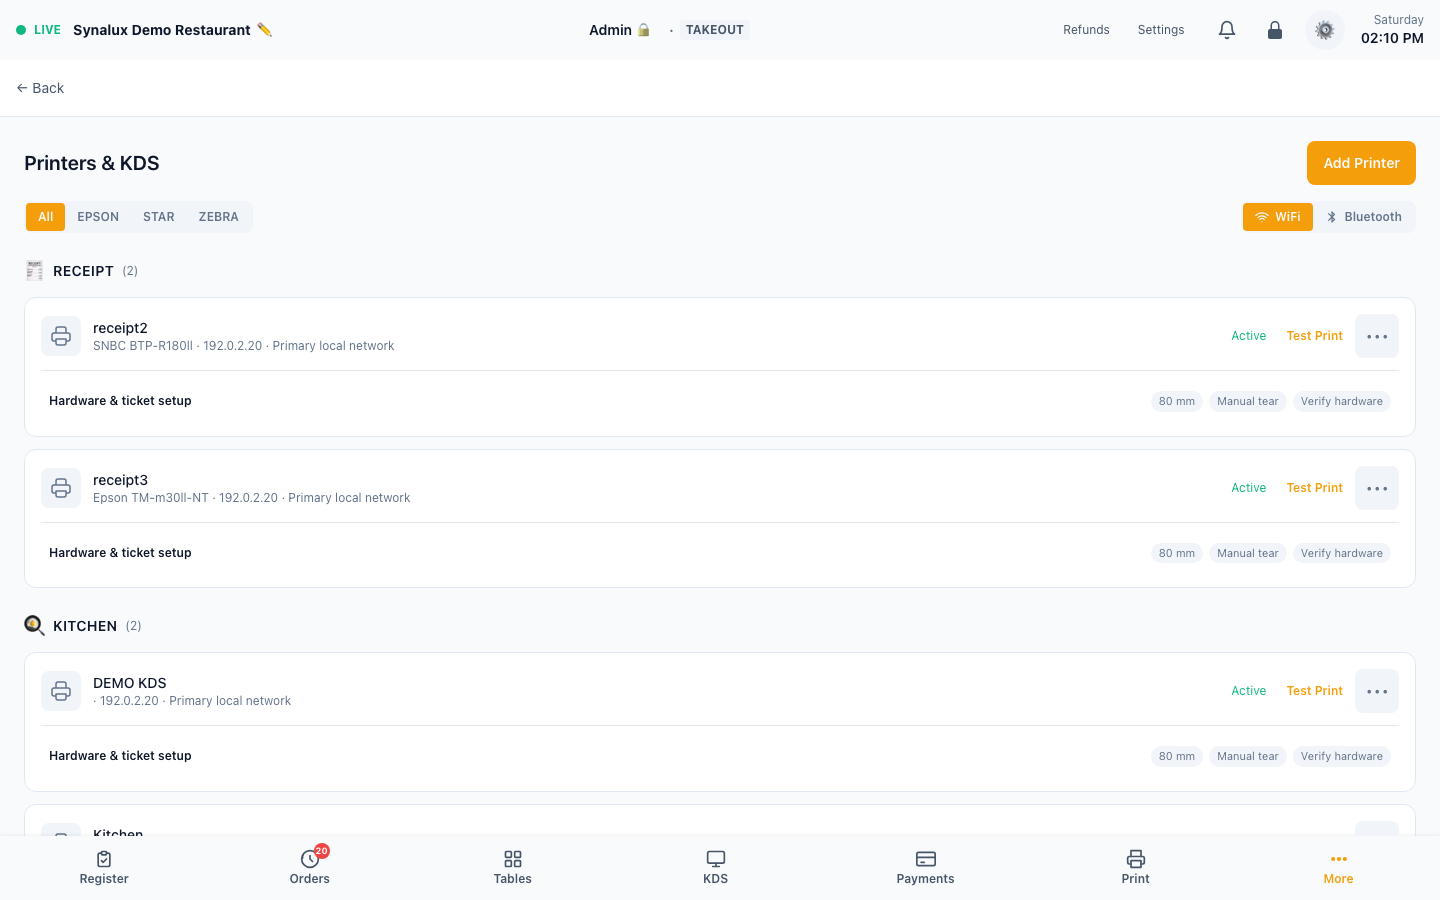
The demo has configured receipt and KDS destinations but no explicit category routing rules. The current screenshot shows those configured devices with network addresses masked. With no routing rules, items continue to use each item's selected KDS Station; explicit category rules override that default for selected categories.
Supported Hardware
| Use | Connection | Examples |
|---|---|---|
| Receipt and kitchen tickets | Network, USB, or Bluetooth where supported | Common Epson, Star, and compatible thermal printers |
| Labels | Network connection | Compatible Zebra label printers |
Select the correct make and model in Settings > Printers & KDS, then run a test print on the exact printer and media used by the venue. Hardware and browser support varies by model.
Network Printer Setup (Recommended)
Best for restaurants — printer connects to the same LAN as the POS terminal.
- Assign a static IP to the printer (check printer's network config sheet — hold Feed button during power-on on most models)
- Go to Settings > Printers & KDS
- Click Add Printer
- Enter a friendly Name (e.g. "Front Receipt", "Kitchen 1")
- Select or enter the printer's correct make and model
- Select a Station: receipt, kitchen, bar, expo, or label
- Select Network (LAN) and enter the printer's IP address
- Click Add Printer, then Test Print to verify
Cloud POS + local printer: When the POS is hosted online but the printer is on the venue's private network, install and register the Synalux Print Relay at that physical site. The relay delivers print jobs to the local printer without exposing the venue network to inbound internet traffic.
Printer auto-discovery: If a local relay is running, discovered printers appear at the top of the settings page. Click Configure to auto-fill name, IP, and model.
Cloud Print Relay (Required for Cloud → Local Printing)
If your POS is hosted in the cloud (pos.synalux.ai) and your printers are on a local network (192.168.x.x, 10.x.x.x), install the relay app on any computer at your venue.
iOS / iPad users: No relay is needed for supported direct printing from the iOS app to a printer on the venue network. Add the printer in Settings > Printers & KDS and tap Test Print.
Download and install:
| Platform | Download |
|---|---|
| macOS | Download .dmg |
| Windows | Download .msi |
Setup (one time):
- Download and install the relay app
- In Settings > Printers & KDS > Cloud Print Relay, choose the physical site and select Prepare Setup
- Select Open Relay App and allow the browser to hand the one-time setup link to the installed relay
- Confirm that the relay is reported as configured, then use Test Print on each printer at that site
- Configure startup and update behavior according to the installer and operating-system policy used at the venue
The desktop relay uses the one-time setup link and does not require staff to edit configuration files. Protect relay setup access as an administrative operation and replace a relay from the same settings panel when a computer is retired.
How it works: The registered relay receives jobs for its assigned venue and site, delivers them to the selected local printer, and reports the result back to the POS. If delivery is uncertain, review the job before reprinting so a receipt or kitchen ticket is not duplicated.
Troubleshooting:
| Symptom | Fix |
|---|---|
| Nothing prints after Test Print | Make sure the relay app is running (check system tray) |
| Relay connected but printer doesn't respond | Verify the printer address in POS settings, confirm the printer is powered on and on the same venue network, then run Test Print again |
| Relay app won't start | Check the computer's internet connection and restart the installed relay. Contact Synalux support if it still does not connect |
USB Printer Setup
Uses the browser's USB device connection. Chrome and Edge are the supported browser path; operating-system or vendor drivers may still be required for the printer to appear as an available device.
- Connect the printer via USB to the POS terminal
- Go to Settings > Printers & KDS > Add Printer
- Enter Name, Model, Station
- Select USB (Browser Native)
- Click Add Printer
- Click Test Print — the browser shows a serial port picker, select your printer
- The browser remembers the selection for future prints
Requirements: Use a supported Chrome or Edge release and allow the browser's device permission when prompted. The first test print requires a staff action.
Bluetooth Printer Setup
Uses the browser's Bluetooth device connection. This can be useful for supported mobile POS terminals.
- Put the printer in Bluetooth pairing mode
- Go to Settings > Printers & KDS > Add Printer
- Enter Name, Model, Station
- Select Bluetooth (Browser Native)
- Click Add Printer
- Click Test Print — the browser shows a Bluetooth device picker, select your printer
Requirements: Use a supported Chrome release and allow the browser's Bluetooth permission when prompted. Confirm the exact printer model supports browser-based Bluetooth printing.
Cash Drawer Setup
Cash drawers connect to the receipt printer via an RJ-12 cable (the "DK" port on the back of most thermal printers). The configured receipt printer opens the drawer, so the drawer does not need a separate USB connection.
- Plug the drawer's RJ-12 cable into the printer's DK port (labeled "DK" or with a drawer icon)
- In Settings > Printers & KDS, ensure your receipt printer is configured with station = receipt
- An Open Cash Drawer button appears next to Test Print — click it to kick the drawer
- The drawer also kicks automatically after a cash payment, and on No Sale — the No Sale action physically opens the drawer (to make change) and records a no-sale audit event
Troubleshooting:
| Symptom | Fix |
|---|---|
| Drawer doesn't open | Check RJ-12 is in the DK port, not the phone/network port |
| Opens intermittently | Replace RJ-12 cable — these are fragile |
| Wrong drawer opens | Check DK1 vs DK2 port on the printer |
| "Open Cash Drawer" not visible | Printer must be assigned to the receipt station |
KDS Routing (Multi-Printer)
Route menu categories to specific printer stations so bar items print at the bar, food items print in the kitchen, etc.
- In Settings > Printers & KDS, scroll to KDS Routing
- Click Add Route
- Select a menu category (e.g. "Appetizers", "Drinks")
- Select a station (kitchen, bar, expo)
- Set copies (1–3)
- Click Add
When an order is sent to kitchen, items are split by category and routed to the correct station.
Troubleshooting
| Issue | Steps |
|---|---|
| Network printer not responding | Confirm the printer is powered on, on the same venue network, and still uses the address saved in Settings > Printers & KDS. Run Test Print and contact the venue network administrator or Synalux support if it remains unavailable |
| USB "No port selected" | Use a supported Chrome or Edge release, reconnect the USB cable, run Test Print, and choose the printer when the browser asks for device permission |
| Print goes to wrong printer | Verify each printer has the correct station and check KDS routing rules. |
Offline Mode (PWA)
Synalux POS is a Progressive Web App (PWA) with an offline queue. After the app shell and menu have been loaded and cached on a terminal, staff can continue building orders, accepting cash, and using supported cached workflows during a network interruption. Queued work syncs after connectivity returns. Every venue should rehearse its offline workflow before go-live because card behavior, cached data, browser storage, and connected peripherals depend on the configured terminal and processor.
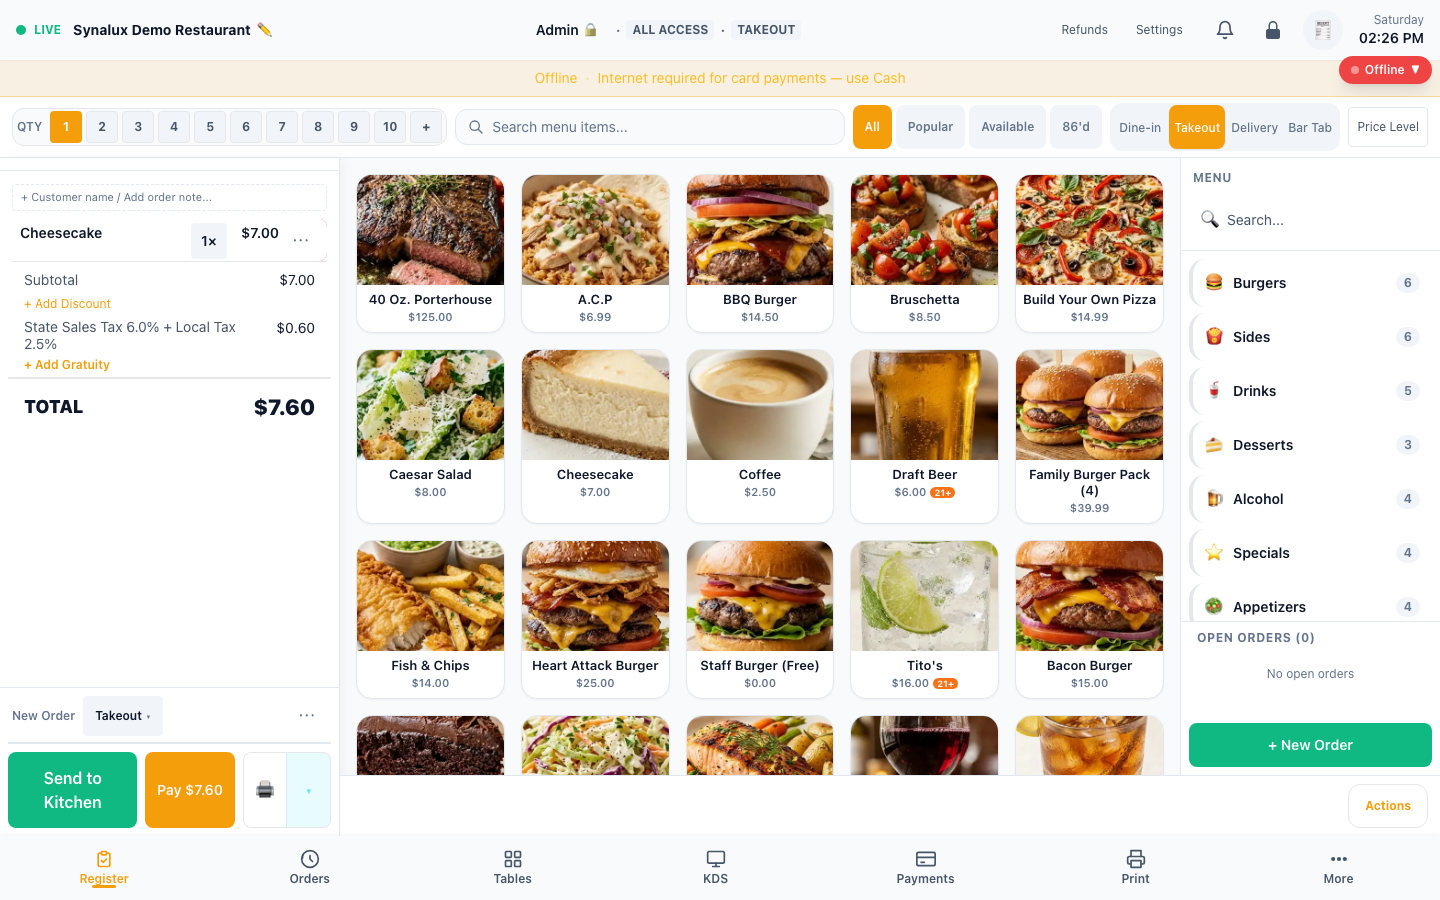
When the network goes down, a warning banner and red "Offline" badge appear at the top of the screen. The current demo explicitly directs staff to cash because Store & Forward is not enabled there. When the connection returns, queued orders and supported payments begin syncing; staff can open the badge to review queue state and any failures.
What works offline:
| Capability | How it works |
|---|---|
| Orders | Queued on the terminal and submitted once connectivity returns |
| Cash payments | Recorded locally with the order and synced when network returns |
| Menu browsing | A recently loaded menu remains available for up to 24 hours so staff can ring items without network |
| Reports | Recently loaded order and payment data is cached for four hours. Sales totals and payment mix can use that cache; reports that require uncached item, labor, or provider data still need a connection |
| PDF receipts | Generated in the browser when the receipt/PDF code and order data were already loaded on that terminal |
| Screen availability | Recently opened Register, KDS, Tables, and EOD screens may reopen offline. Live data and uncached screens still require a connection |
What requires network or an explicitly enabled fallback:
| Capability | Offline behavior |
|---|---|
| Card payments | With no internet, the Register cannot start a card payment: tapping Card shows that internet is required and offers Cash or Start Tab (charge later). Store & Forward is the terminal's own capability for a different case — the Register is online but the terminal cannot reach its processor — and is described in the Store & Forward row below |
| Bar tab pre-authorization | Requires the processor connection; do not treat a locally queued order as an active card hold |
| Staff clock in/out | Requires a network connection; shift punches are not part of the offline order/payment queue |
| New split-check persistence | Requires a connection. Do not start a new split while the order still exists only as an unresolved offline order |
| End-of-day totals | Requires current synchronized data. A previously opened EOD screen may appear, but an uncached or stale summary is not a safe closing figure |
| Real-time KDS updates | Live updates pause while disconnected. Confirm the kitchen display is current after connectivity returns |
| Receipt email / SMS | Requires an active connection and configured delivery service. A PDF receipt may still be available when its screen and order were already loaded |
Offline safeguards and reconciliation
- Queued orders and supported payments are tracked so reconnect and page reloads do not invite duplicate submission
- Temporary failures retry automatically; rejected or expired work is surfaced to staff instead of disappearing silently
- Multiple open tabs are reconciled against the same order state after reconnect
- If a card result is uncertain, do not repeat the charge manually. Review Payments > Needs Review and follow the processor reconciliation workflow
- Queue entries older than 48 hours expire with a staff notification and must be reviewed or re-entered
Tender behavior after reconnect
| Tender | Staff-facing behavior |
|---|---|
| Cash | The payment follows the queued order after reconnect. Offline cash gratuity allocation is unavailable because the complete settlement must be recorded together |
| Store & Forward card | Applies when the Register is online but the payment terminal cannot reach its processor: a terminal configured for Store & Forward holds the transaction in the device and forwards it on reconnect. The POS records the charge and accepts it up to a configurable per-transaction floor; charges above the floor, or any charge when the venue has turned Store & Forward acceptance off, go to Payments > Needs Review. Acceptance is on by default for Dejavoo terminals and off for Stripe Terminal unless the venue turns it on. It is the venue's risk to accept |
| Bar tab pre-authorization | Requires the processor connection; a queued order is not an active card hold |
| Manual card, gift card, and House Account | Wait for connectivity and for the order to finish syncing before collecting payment |
| Split payment | Reconnect and confirm the order before starting or completing a split |
Setup
- Open the POS in Chrome or Safari and add to home screen — installs as a PWA automatically
- When network drops, a red "Offline" badge appears in the top-right corner with queue status
- Verify that offline orders and cash payments queue locally and reconcile after connectivity returns
- If the venue has approved Store & Forward, configure its limits and permissions in Settings > Venue, then test an eligible processor/device path and the Payments > Needs Review workflow. Without that explicit setup, card and bar-tab authorization require internet
- Test reconnect, duplicate-submit protection, rejected items, and queue-expiry handling on every browser/device type used by the venue
Customer Display
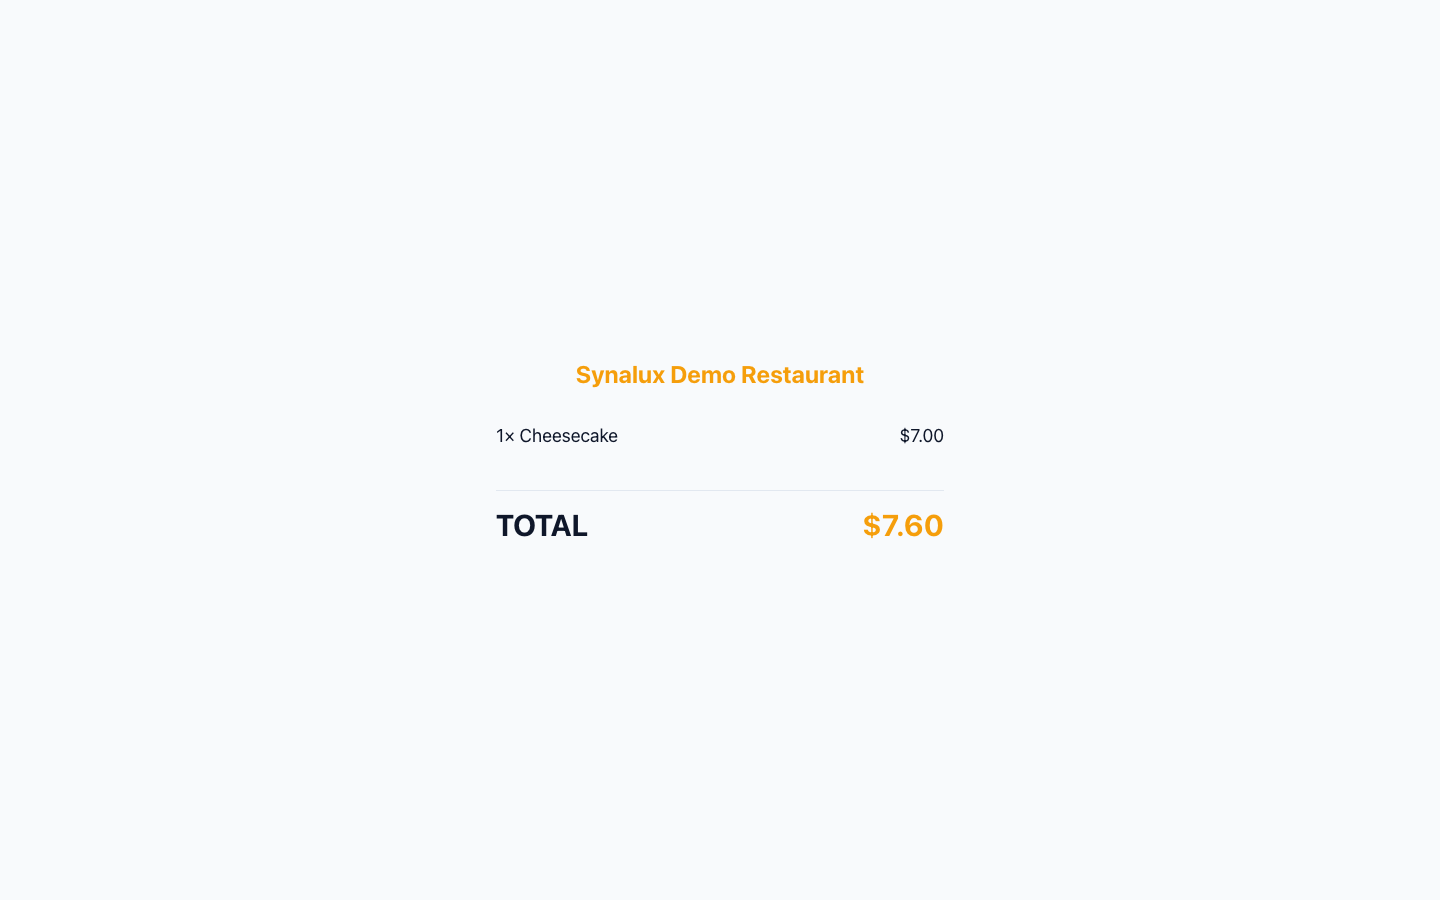
Second screen facing the customer with live order, running total, and idle promos.
Setup
- Open
/pos/displayon a second iPad or monitor facing the customer - The display auto-syncs with the active register order in real time
- Configure idle promo images in Settings > Venue
Digital Menu Board
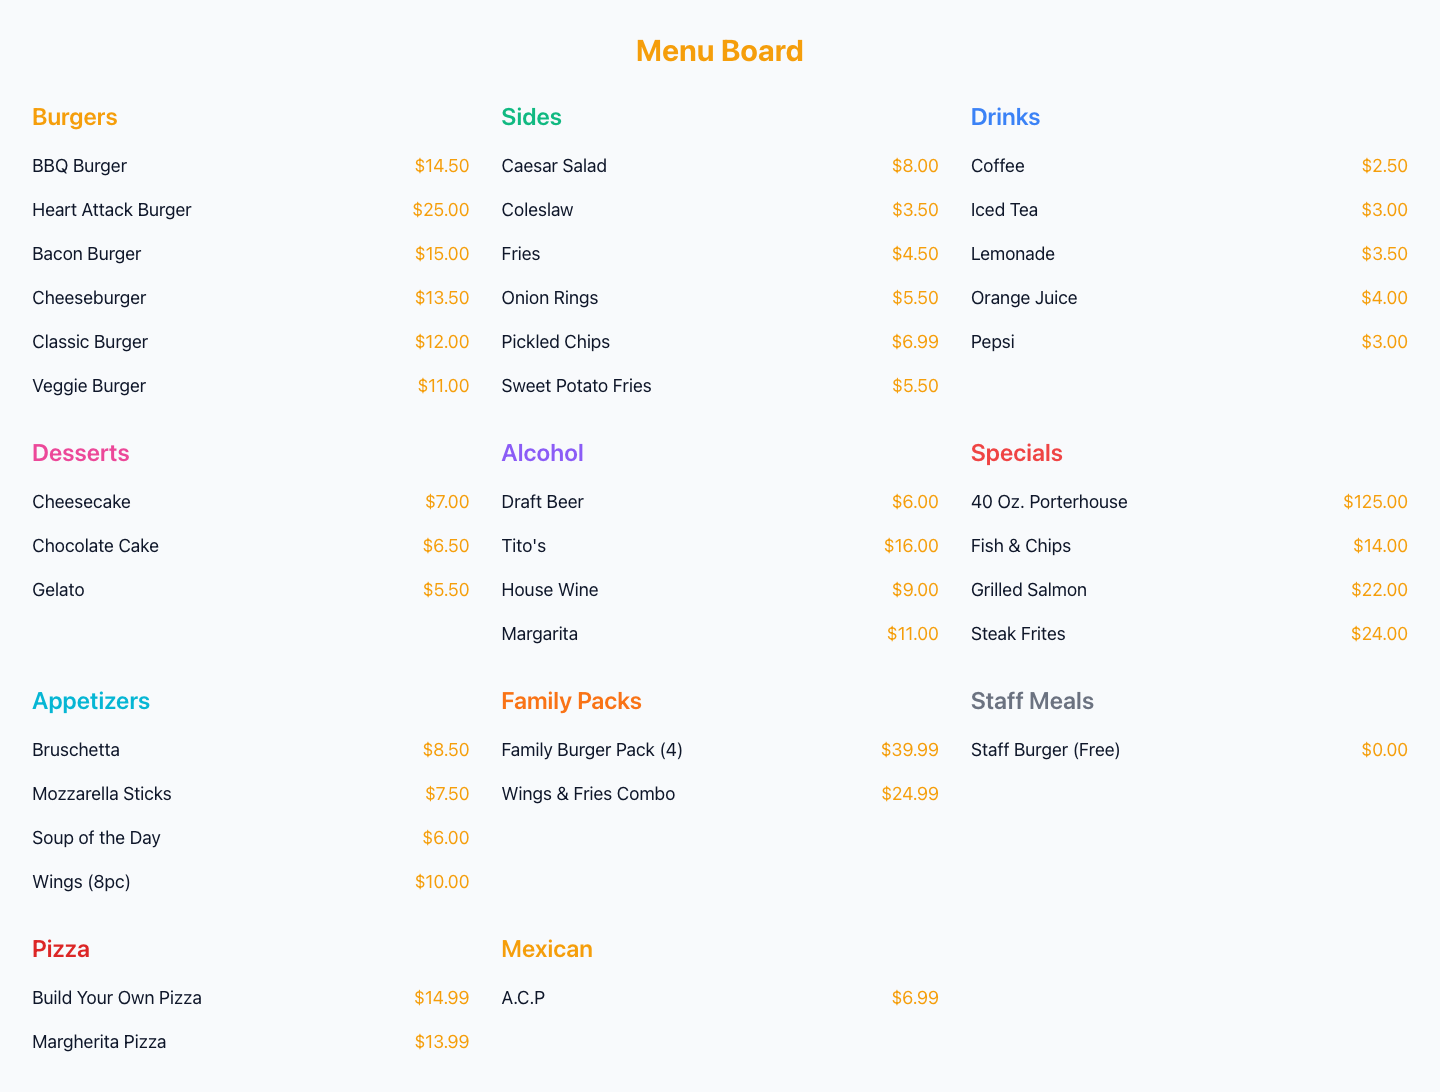
Configure layout, sections, and pricing display. Assign to any TV or display.
Setup
- Open
/pos/boardon any TV or large display - Configure columns, font size, prices, and images in Settings > Screen Builder > Menu Board. The board groups the active Menu Builder items by category
- Prices and availability auto-sync from the menu builder
Notification Bell
Real-time alerts for new online orders, order-ready bumps, table timer alerts, and low stock warnings. Configurable per notification type with sound alerts. Bell icon in the top bar shows unread count — tap to expand the notification drawer without leaving the current screen.